Race Course Certification
Courses must be certified for any road running performance to be accepted as a record or to be nationally ranked. We have found that most 5K and 10K routes do not need to be USTAF® Certified. Runners do however want accurate and properly marked courses. Because of this, we offer measuring services that assure up to 97% accuracy on every course. All 5Kevents Race Directors are properly trained on how measure courses.
Course Measurement – How to measure the race course

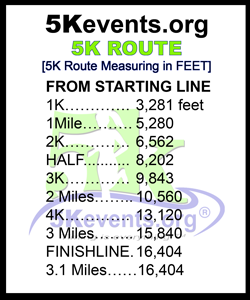
5K ROUTE Basics [5K Route Measuring in FEET]
FROM STARTING LINE
1K…………. 3,281
1Mile……… 5,280
2K…………. 6,562
HALF WAY MARK (Water Station or Turn-a-Round) : 8202 feet
3K…………. 9,843
2 Miles…… 10,560
4K…………. 13,120
3 Miles…… 15,840
FINISH LINE
5K…………. 16,404
3.1 Miles… 16,404
Use this handy chart next time you measure your route. Right Click on image above, save and print.

Up until 5Kevents came into the race arena, the only way to get a course certified was to utilize the USTAF®. 5Kevents members have the ability to measure courses for 5K Fun/Run Walks without using a USTAF® Course certification program. A USTAF® certified course is rarely needed however it is extremely important that your course is accurately measured. Many runners use GPS tracking devices today and their time/distance is very important to them. It is critical your course be properly measured for the integrity of the run and for repeat business.
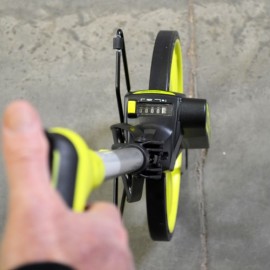
THE MEASURING WHEEL: (Shown to the left)
5Kevents utilizes a measuring wheel or a device called the “Jones Counter” to accurately record the distance needed from start to finish. 5Kevents.org measures the shortest distance (SPR).
For the most part, 5K Run/Walks do not need to be USTAF® Certified, but again should always be properly measured. DO NOT rely on your GPS to record distances. There are too many factors that cause issues while using GPS.
.
Measuring as a “5Kevents RACECOURSE CERTIFIED”: $300 per distance (5K) plus $100 Fee for each additional mile. (This is NOT to be considered “USTAF Certified” unless approved by the USATF)
.
USTAF® CERTIFICATION: Same as above but add an additional processing fee for additional paperwork requirements. Certification last 10 Years
Instructions to have your course certified are shown below as well as detailed instructions for measuring your route:
The first step in the process of getting a course certified is to fill out this nifty registration PDFform with USATF (USA Track and Field). However, the real meat of the course certification process is actually measuring the course. This is all contained in a sizable 1MB PDF file . And it’s in this document where the details are.
HOW WE DO WHAT WE DO:
The first step in what we do is to map the course on MapMyRun.com. This way, we can see what the course is supposed to look like, and see if it may be the correct length. BUT, before we can decide if it is close to the correct length, we zoom-in on the course, and turn on the Satellite View. We can then see if it was mapped following the Shortest Possible Route (SPR). If not, we edit the path of the course, to follow the SPR. We also ask about lane restrictions, as we need to measure following the SPR that the runners will be allowed to run on race day.
Once the proper course has been established, we then see if we need a spur to adjust the length, or if the Start or Finish can float, to allow for proper course length. MapMyRun is not accurate to the precision of proper measurement, so we need about a 100 yard window for where the Start or Finish may land, if we don’t have an adjustment spur.
Once established, we download a GPS track of the course onto our tracking device. This way, we are not looking at maps while trying to ride the SPR. Much better way to make our way around the course!
We then head to the course to be measured. We turn on the GPS tracker, and locate our measurement starting point (either Start, or Finish, or at the start or end point of the adjustment spur). We mark the location with a route flag or piece of duct tape (sometimes we use sidewalk chalk). We then walk the route, marking our splits as we go (unless we started at the beginning/end of the spur). We ride until we get the total distance for the course, and see where that is. If it is in an acceptable location (close to where we wanted it), great!. We put another piece of duct tape down, and turn around. We then ride the opposite direction, noting our KM/Miles as we go. When we get back to where we began (the piece of duct tape), we note our distance. If we have not measured enough distance for the entire course, we note our click-count, then continue until we reach the correct number of clicks (Distance). If we stop short of our mark, we note the clicks needed to reach our mark.
Flags are placed at each km and mile location. We also mark the indicator (Start, 1 mile, etc.). We take a picture of each mark, showing enough background so someone can tell they are in the correct location. We also mark a GPS waypoint. We do this for each location.
We then return to the course, and repeat the process for accuracy. Once complete (assuming the 2nd measurement matches the first),we go home to make the map. If, on the other hand our measurements are off, we may need to go out and move the Start, Finish, or Turnaround point, depending on what can move. We hope this doesn’t happen, but it sometimes will. Now at our office, we complete the paperwork.
While we use Adobe Illustrator, Photoshop, and Adobe Acrobat Standard, we also advocate the use of OpenOffice. OpenOffice is FREE, and has layering, similar to Illustrator. We use Photoshop to do screen-capture cropping, but you can get ScreenHunter FREE, and it captures just as well.
In making maps, one of the most important factors is the order of layers. We capture the MapMyRun satellite image, keep it proportional while we scale it to fit properly on the sheet (3/8″ open borders on all sides of the page). Then, we zoom-in on smaller areas of the image on MapMyRun, so we can see more detail. Capture those enhanced images, and place them on the main satellite image (on a separate layer). After that, we put black road lines on a layer, then copy the black lines, paste them onto a higher layer, turn them white, then reduce the stroke of the white lines, by one point. This creates nice roads.